Have you heard of or seen an interlocking crochet scarf? It looks like chains held together, or kind of like little puzzle pieces. I was first introduced to it when scrolling through Pinterest…. Interlocking Crochet Scarf.
It looks pretty neat, and it seemed easy enough, so I decided to give it a shot. Below is a photo and written tutorial on how you can make this!
I personally am not a fan of so many colors, so I went with a monotone theme of grey, white, and black. If you want the interlocking effect to really stand out, it is probably best to use at least 2 colors. If you give this a try, comment with a picture below! There are tons of different color combinations for this kind of project. It also works up really fast, so it’s a great last minute gift to anyone that likes to accessorize!
Materials used:
- Red Heart Super Saver yarn in Heather Grey, White, and Black
- Size J/10-6.00mm crochet Hook
- Scissors
Abbreviations used:
- ch- chain
- dc- double crochet
- st- stitch
Chain 217 or to length of choice. I like my scarves to be a bit on the long side. Remember, there are tassels on the end! In later pictures, my original chain was white. I am just using the grey yarn here to illustrate.
In the 3rd ch from the hook, dc. 3 dc in next 3st.
Chain 5. skip 5 st. 5 dc in next 5 st.
Continue in this same manner until you reach the end. Fasten off. Congratulations, you have now made the first “chain” for your interlocking scarf!!
With your next color (for me, this was grey, since the first one was white), the beginning is the same as the first chain you made. ch 217, dc in 3rd ch from hook, 3 dc in next 3 st. Weave the chain through the holes of your first interlocking chain. Over, under, over, under. If it seems longer than your other chain, don’t worry: when you are making the chain spaces, the length decreases a bit as you go.
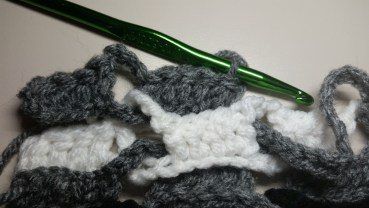
Now that your chain has been weaved through, now you can ch 5, skip 5 st, and dc in the next 5 st. The key point here is to make sure that you go over or under the chain space that you created originally. Look in the first picture below. I have 4 double crochets, I chained 5 times, and now I’m going to make sure that the white chain space is in this hole before I close it with my next double crochet. This is how your chains get interlocked together.
Once you get to the end of the this chain, fasten off. Now on to the next color!
A couple of tips for interlocking the next chain.
- Make sure that you are going under/over the same way that you did the first time! Otherwise, you get a cascading effect (which is fine, but that really isn’t the look that we’re going for here).
- Decide your color scheme. Are you sure that orange looks best by the green? Color placement is everything. Or if you’re like me, all dark colors go together fine, so I’m doing white and grey on the inside, with black chains on the outside to border it.
Now that you know how the interlocking crochet scarf is assembled, feel free to add as many chains as you want! I think this would be great as a belt with only 3 interlocking chains, or as a really thick scarf. Once you’re done, add some tassels. I will add a picture of my final product once I’m finished! I bet this would also be a really cool blanket if it was done correctly and with a bulky yarn.
Happy hooking! Share your interlocking crochet scarf creation below to inspire others to give it a shot! Also, feel free to comment with any questions that you have.


Leave a Reply